Step-by-Step HVAC Installation Guide
Step-by-Step HVAC Installation Guide
-
Extracting the Plug from the AC Unit: To initiate the installation process, our experienced technician will carefully extract a plug from the AC unit, which typically operates at either 110v or 220v. This step is crucial as it establishes a secure electrical connection for powering the scent diffuser. The technician will ensure that the extracted plug is compatible with the diffuser’s requirements, ensuring both safety and functionality.
-
Creating a Plug or Bracket for the Scent Diffuser:
- From the AC Unit: The technician will either modify the extracted plug or use a suitable adapter to create a plug connection between the AC unit and the scent diffuser. This ensures that the power source is correctly supplied for the scent diffuser to function properly.
- From the Brackets: If you're opting for a bracket-based installation, brackets can be installed near the AC unit to hold the scent diffuser securely in place. These brackets will allow for the attachment of power and tubing, ensuring that the diffuser stays in a stable position for efficient fragrance distribution.
-
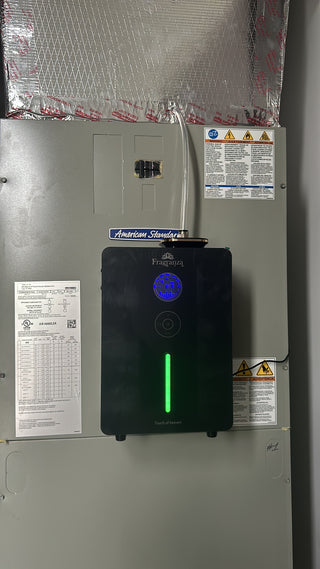
Positioning the Scent Diffuser: Once the electrical connection is established, the scent diffuser will be strategically positioned near the AC unit to facilitate the efficient dispersal of fragrance throughout the designated area. The diffuser’s placement is key to optimizing the spread of scent and ensuring a consistent fragrance experience.
-
Inserting the Diffuser Tube: A small aperture, typically around 2 inches in diameter, will be created in the air handler to accommodate the insertion of the tube provided with the scent diffuser. This meticulous step guarantees seamless integration and enhances the overall effectiveness of the scent diffusion system. The tube will be securely inserted into the air handler to allow the scent to travel through the HVAC system.
-
Optional Flat Positioning: It’s important to note that while this installation process ensures optimal performance, the scent diffuser can also be used in a flat position without the need for complex installation procedures. This flexibility allows you to deploy the scent diffuser in various environments, meeting different preferences and requirements.
-
Final Touches and Testing: After completing the installation and ensuring that all connections are secure, the technician will test the scent diffuser’s operation to verify that it is working properly and dispensing fragrance effectively. This is done to confirm that the integration with the AC unit or brackets has been successful.
-
Ongoing Support: Our commitment to excellence extends beyond installation. Our dedicated technical support team is available to offer guidance and assistance should you need help with operation or troubleshooting. We are here to ensure your experience with Fragranza613 is nothing short of exceptional.


